My new Fox No. 24 typewriter is a total fox – or a totaled fox. When I took it out of the shipping box from the eBay seller, I found the back left corner (cast iron) had broken off in shipment.
ACK!
It wasn’t typing, so what mysteries lay within? I felt that it could type since hitting the keys was causing a flicker of movement in the carriage as if it wanted to type. Time to take it apart.
Words Are Winged has a great photo spread on the dismantling of the Fox typewriter which was very helpful. Over at Google Books, The Expert Typist by Clarence Charles Smith (1922) is newly found resource for me. It has information on the general use and operation of Fox, Multiplex Hammond, Noiseless, LC Smith, Remington, Smith Premier, Royal and Underwood typewriters as well as more advanced typing such as stencils and mimeograph operation and the preparation of statistical reports. It’s a window into the world before word processors, spreadsheets, and printers.
The dedication of The Expert Typist is heartbreaking:

The Expert Typist has a section on how to remove the carriage from a Fox typewriter on page 12:
“Carriage. – Carriages of the Fox typewriter are interchangeable, and different lengths can be kept on hand and used as the work requires. To remove the carriage, first remove the carriage scale pointer (No. 2312), unfasten carriage drum strap (No. 189) and attach it to hook (drum strap post, No. 133), then take out, or nearly out, the two screws (No. 558) found near each end of the carriage.”
The Expert Typist
By Clarence Charles Smith
Google books
Following the carriage removal instructions, I took off the carriage scale pointer:

I removed the two rusty screws that hold the carriage scale pointer in place
I was unfastening the carriage strap and the draw strap done broke.

Oh. Heck. The ancient draw strap disintegrated when handled
Carry on. Backed out the two carriage screws on the back on the rear left and right:

Check out the green corrosion. There is a matching carriage screw on the left that I backed out enough to removed the carriage. This photo was taken just before I lifted the draw band (drum strap) from its anchor. As I moved it to the drum strap post, it fell apart in my hands.
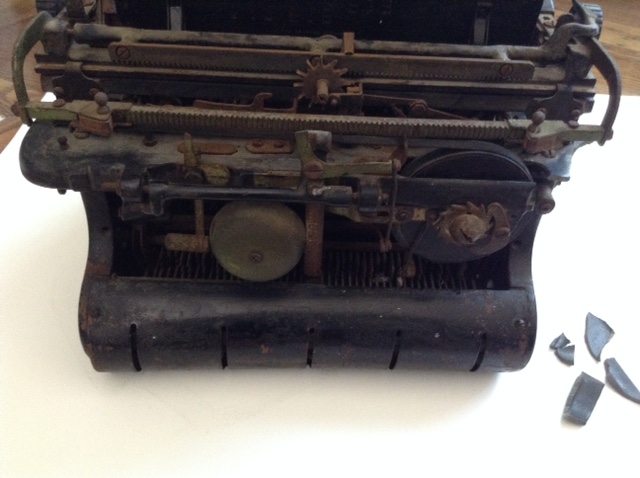
I then lifted up the carriage to reveal large pieces of broken cast iron on both sides of typewriter. Good. Golly.
These two pieces should be one:

And the other side was broken too:


Well. Heck.
It appears that those two cast iron bars are part of the shift mechanism though I am not sure of their purpose. They seem to support the basket during shifts. If you know the name and purpose of these broken parts, let me know. I’ll be using JB Weld SteelStik or an epoxy adhesive to re-secure them.
Onward: the platen pops out after you loosen a screw on either side and move the platen slide back:

Here’s the machine dismantled (I re-attached the carriage scale pointer after I cleaned it because I was worried that I would lose it).

Fresh Hell: then the front bar fell off. I hadn’t noticed that it was cracked and broken as well:

First thing first: I blew out the inside of the machine with my small air compressor. It wasn’t terribly dirty – just very rusty and corroded.

The front carriage rail was rusted and the carriage moved with a painful screech. The escapement wheel and pinion wheel were moving but stiff with rust. Many of the typebars were paralyzed with rust. The ribbon vibrator was rusted into an “up” position. Everything that should move smoothly was crunchy.
I saturated everything with PB B’laster Penetrating Catalyst, let it sit for a few hours and then began to move the parts gently with my hands. They started to loosen up.
The detached carriage was stuck at certain points along the rail – a star shaped wheel on the rail was not moving smoothly along the rail so I doused everything in PB B’laster and moved the carriage back and forth manually until I felt something akin to a gliding sensation.


Carriage – upside down view: star-shaped wheel that moves along the rail was sticking.
I got the feeling that this thing might type since hitting the keys was moving the parts of the escapement assembly attached to the machine (the loose dog and rigid dog?). Cleaning and lubrication had freed those parts up nicely.

View with carriage removed: cleaned and lubricated loose dog (?) now moving and able to slip in and out of teeth in the escapement wheel during typing.
The escapement wheel looks battered – the beveled teeth are a bit chipped and worn.

Chipped tooth
I made a new draw strap out of 80lb fishing line and set the carriage back on the body.

I need classier drawstring material. The fishing line works but it’s a little down-market.
I tested typing. The carriage advanced one space for each key struck. I burst into song.
I spooled new red and black ribbon onto the old spools and tried her out.

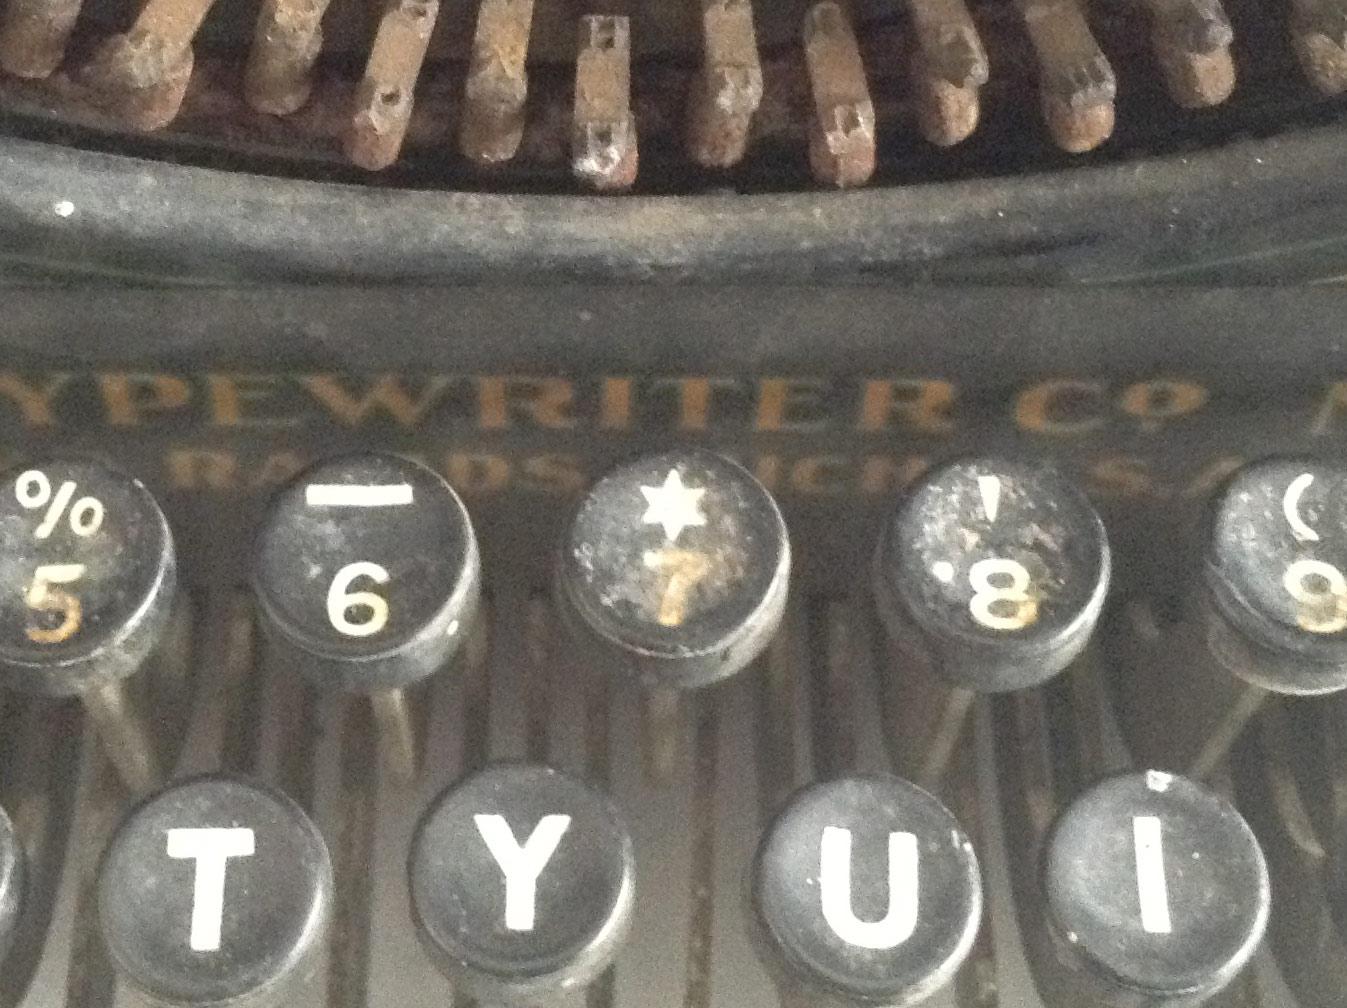
Looks like my Star of David is indeed an asterisk. Sometimes an asterisk is just an asterisk.
The Fox has a beautifully simple ribbon color switcher: a red key for red typing and a black key for black typing. Even I can figure this one out.

Once I had the machine typing, I began cosmetic improvements. I took my bell and carriage return lever over to Good Neighbor Brian’s shop since he wanted to get in on the fun. He got to work right away.

Brian used a slow buffing wheel (about 1800 RPM) and pink buffing rouge to polish the bell. It cleaned up beautifully.

I was amazed at what he did with the carriage return lever. I had gotten most of the green corrosion off, but it was dull. He polished it to a mirror-like finish with a small 4″ diameter buffing wheel at 1800 RPM and pink buffing rouge:

Remember – it was really bad before:

This makes me want to get my own variable speed bench grinder and buffing wheel.
I had removed some of the old brass / nickel / chrome pieces that were easy to detach and soaked them first in Evapo-Rust and then in Lime-A-Way.
The Evapo-Rust took off surface rust but did nothing for the green corroded parts. I had tried chrome polish on the greenly corroded pieces, but it wasn’t doing anything. I dug around in the garage and found Lime-A-Way which has a list of powerful acids in it. It was the Lime-A-Way that removed the green corrosion. Unfortunately, it also turned some of the pieces slightly pink after a prolonged dunk. The acids in the Lime-A-Way are a bit much for the metal I am dealing with here and caused copper leaching/displacement that was then deposited on the surface of the metal (I am guessing here).

I found an interesting post on a home barista website that described the chemical reaction and fix, so I started polishing to remove the copper deposits with my Dremel and a polishing disc. There wasn’t much shiny chrome on the paper fingers to begin with and less after my polishing. I may walk it over to Brian’s and see if he can put a shine on the metal. I’m planning to wax all the parts to prevent future rust and corrosion

Onto the rusty typebars: they look bad but don’t really affect the functioning, but I wanted to clean them up anyway. I drenched the typebars and their joints with PB B’laster Penetrating Lubricant. While it doesn’t make rust disappear, it seemed to loosen up rust for removal. I scrubbed the sides of the rusty typebars with super fine Scotch-Brite and super fine sandpaper to get the worst of the rust off them. I followed up with my Dremel, polishing the sides with a 512E Finishing Abrasive Buffs 320 Grit and a 442 Carbon Steel Brush. I scrubbed the type itself with denatured alcohol and a toothbrush and got century-old ink out of the crevices. The typebars are still looking “vintage”, but a little less rusty.

I am still perfecting my methods – though trial and error is not the best way to go about dealing with a fine old machine. I’m a little worried that my very liberal use of PB B’laster will come back to haunt me in the form of solidified gunk and dirt attraction. I may follow up with a flush of mineral spirits, a blow-out with compressed air and then very targeted lubrication. I would love to dunk the metal machine guts into a high-capacity ultrasonic tank full of kerosene or solvent – though it sounds like the makings of my very own Superfund site.
Coming up next: gluing her back together and taking glamour shots of the foxy lady.

Those broken parts are indeed, as you surmised, shifting arms. As an avid and, quite frankly insane, Fox fan, I applaud your wonderful efforts and am beyond glad to see another beautiful Fox in action once more
LikeLike
Since I have an avid Fox fan on the line, I’ve got a question for you: the highlighted section (see image) of the shifting arm should rotate freely, shouldn’t it? It does on the left side, but the right side seems to be rusted into a fixed position.

LikeLike
That part should indeed rotate, since it pivots to allow the shifting basket its upward/downward movement.
LikeLike
That’s what I thought – I am soaking it in penetrant as we speak and I may need to gently tap it free.
LikeLike
Looks like you’re bringing her back from a near-death experience. Brava!
LikeLike
I’m always amazed at how incredibly durable these old machines are. You would think that the Fox had suffered catastrophic injury with the broken shifting arms, but she keeps on typing.
LikeLike
Absolutely fabulous – those pointing hands are very special. Great to see it typing, looking forward to the glamour shots!
LikeLike
“Glamour shots” is stretching it. She looks like a cranky hundred-year-old machine – just a little cleaner than she was on arrival.
LikeLike
Heh, no selling yourself short – you’re doing absolutely transformative work on the fine Fox. Very big kudos 😀
LikeLike
Mary, Your blog is an inspiration! I mean it. I always enjoy seeing the progress you make on the “needy” typewriters you take in. I also appreciate the resources that you share. I recently got a 1954 Remington Noiseless office machine and thought of you- look at all those levers! And they mostly all work! https://goo.gl/photos/k923nz1CREMoVurX6
LikeLike
Wow – I had no idea that a Remington Noiseless Standard had that under the hood. If I come across one, I’ll need to investigate more closely.
LikeLike
Well done. That front frame cracked right where I’ve seen many of them crack — at the point that the TAB key penetrates. Looks like your machine is well underway to a second life!
LikeLike
That front frame near the Tab button is a very fragile point on a very heavy typewriter.
Your recent posts on Fox typewriters were a great read and especially timely for me. After reading part I, I immediately counted the keys on my Fox 24 (yes, 44 keys)
LikeLike
Thanks; we’re glad you liked them! I just received an actual hardback copy of the book you reference in this post, as an aside. Keep up the good work!
LikeLike
That is absolutely amazing. That return lever really shows what may still be underneath all the corrosion, impressive stuff. Good luck on all that cast iron, difficult stuff (steel dowels come to mind).
Seeing more of the complex mechanism of these machines, can now also imagine they were a bit more costly to build than the competition.
(Hmmm may perhaps not ignore a Fox standard the next time one pops up on the local classifieds like I did a year ago…)
LikeLike
I highly recommend a Fox standard. Even in a state of extreme neglect and damage, this machine still types! It’s a winner in my book for its quality construction, durability and unique mechanics.
LikeLike
What? The front fell off? That’s not supposed to happen. I’ve never even seen a Fox typewriter in person, let alone had any experience working on them. This’ll be good for future reference.
LikeLike
The front frame bar is a pretty thin piece of metal, made weaker where the tab button pops through. My ~30lb Fox seems to have had a pretty bad tumble in shipping, and the front frame bar probably cracked then.
LikeLike
Wow, how informiteve. I also have a Fox no 24, 1909 model. I got it off eBay also and it was just the way I love to get them, oily and very dirty from decades of dry warm storage. ( the old oil gummed most every thing up but kept it from rusting of which this Fox has none of ). I am now in the process of cleaning it up and your descriptions of how to remove the carrage will be very helpful.
LikeLike
I gave my Fox 24 to another typospherian – I think I need to find another one to fill the hole it left behind. They are wonderful and odd machines.
LikeLike